A big thank you to those of you who have encouraged me along the way while I have been renovating my chair – it’s made a big difference 🙂
I am pleased to announce that the chair is now officially finished. The final stitches and tweaks have been done. And just in time too as my final lesson was on Tuesday – thanks Sue 🙂
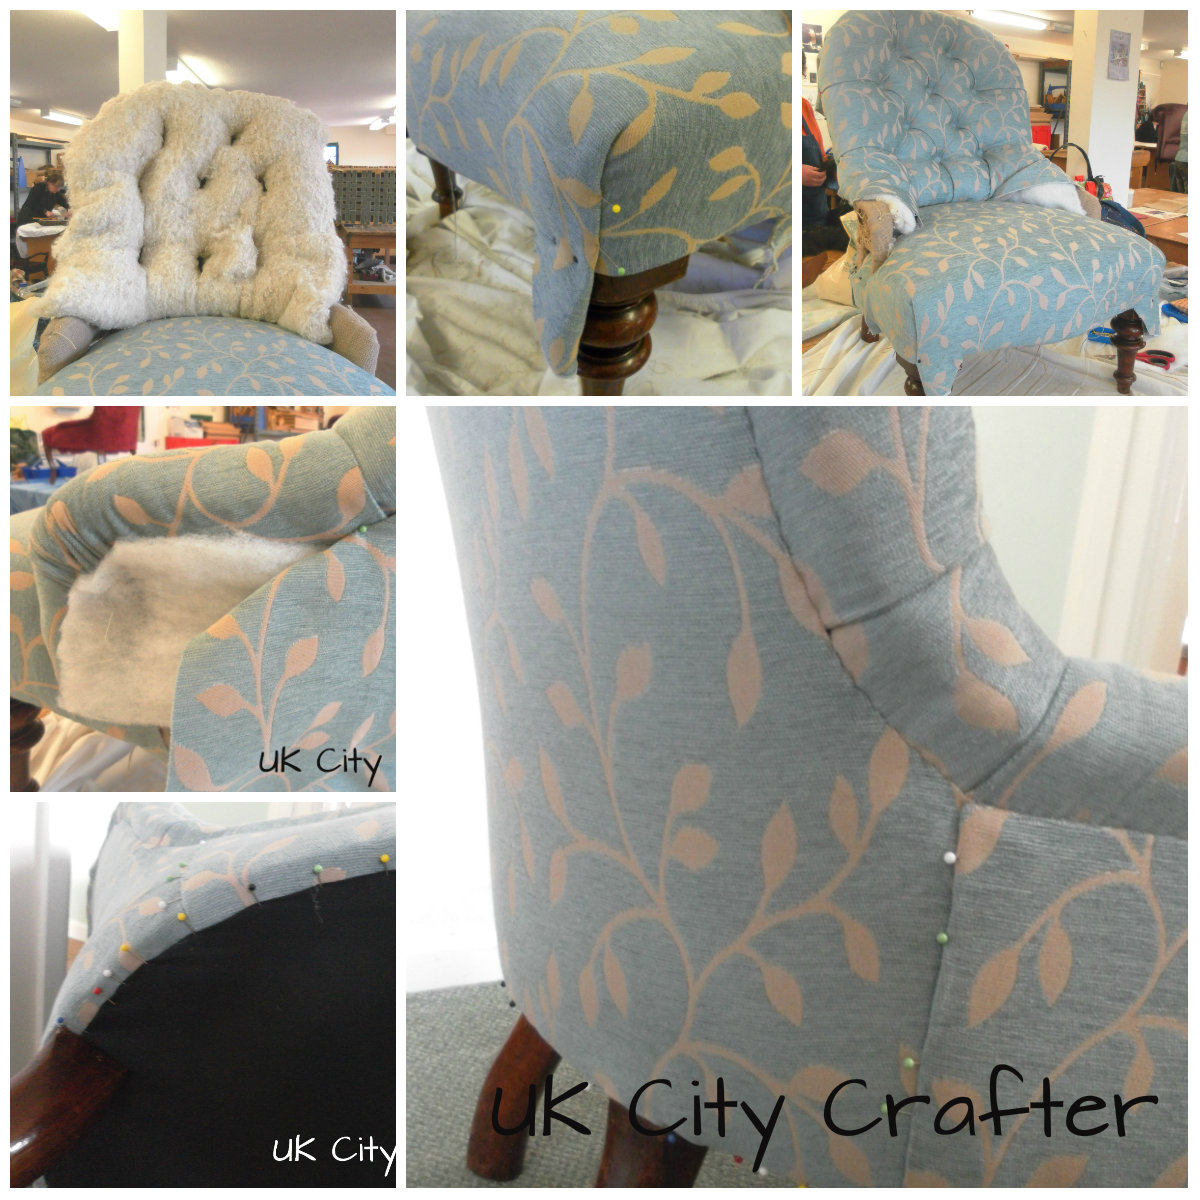
This is a reminder of what the chair started off like and its journey of being stripped back and built back together again…
These were the final stitches in my final class…
and now…
lovely deep buttoning, comfortable seat and gorgeous fabric; cleaned and polished legs and the cotton reel which saved this chair from a skip still in place 😉
My chair is being transformed, and it is so nearly finished.
I did my homework of sewing the out back and out arms on …
It took HOURS. Using a curved needle is a skill in itself, mine kept stabbing me – it reminded me of when I had to use the vicious long needle here!
Apparently I didn’t do the ladder stitch quite right, I should have kept more tension in the thread as I sewed so when I pulled the out back down the stitches wouldn’t show. As it is mine do show a bit but it’s not too bad and I shall know for next time 🙂
I spent class time tensioning the back and arms and securing them with tacks to underneath the seat, then fitting the bottom cloth (sadly I discovered it wasn’t called an out bottom 😉 ) so the mess underneath the chair is hidden. The bottom cloth is traditionally black – not sure why – and has to be taut so it doesn’t sag and so isn’t noticeable when you look at the chair.
Soooo I only have a bit more stitching and tacking the bottom cloth in place and then…done 🙂 🙂 🙂
You may have noticed a new button on my sidebar for an ATC Swap hosted by Very Berry Handmade. Artist Trading Cards are little pieces of art, they are only 2 ½ by 3 ½ inches big so not much space to be creative – or so I thought. After googling them I was astounded at how creative people made them.
Now I wouldn’t class myself as an artist by any stretch of the imagination but this is something I’ve never done before so I thought I’d get out of my comfort zone and give it a go. Funnily enough the swap theme is ‘Something new’ so just by making one I’ll have fulfilled that 😉
This is my progress so far…
A new day dawning
Lots to do yet but it’s started and that can be the hardest part sometimes can’t it?
What’s the last thing you did which was out of your comfort zone?
I always thought the out back referred to somewhere in Australia, but no, it’s an upholstery term for the bit of fabric which goes on the back of the back of the chair – that just appeals to my quirky sense of humour – guess where the out arm is? There’s even an out bottom which really makes me giggle 😉
The fact that I’m now tackling the out back and out arms on my chair means that I’m on the final stages of the renovation (insert an excited squeal here!) .
Do you remember the little parcel I made up to put inside the chair (see the post here)– it contains a note to anyone who renovates the chair after me, samples of the fabrics I found on the chair and a Thruppenny Bit which must have got itself trapped down the side of the arm. Well yesterday I wedged it carefully inside the iron frame of the chair back.
Then I covered it up with two layers of wadding
And finally with the fabric,
all had to be carefully pinned into place
My homework is to get cracking with sewing the out back and out arms on using ladder stitch.
I spent HOURS this week trying to cover the arm of my chair with fabric AND for it to look good. HOURS and HOURS!
It wasn’t until Monday that I realised there was a trick to it, but even then I struggled to get it to look as good (or even vaguely as good) as the arm my upholstery tutor did.
My Tutor’s sideand my side, there are a lot more gathers and they are distorting the front of the arm which you can’t see in this photo.
Yesterday, chair class day, my tutor made some quite minor tweaks and it all looked good – you just can’t beat experience when it comes to practical skills can you? Thanks Sue 🙂
The gathers are now only at the side so the front looks smooth.
The chair is on its way – and very exciting it is too after recent frustrations. I’ve started putting the stud trim around the legs…
Looks good doesn’t it?
Three weeks to go and the goal is in sight 🙂 – just wondering about another project now!
With the help of DaisyBelleCrafts (a self confessed lover of all things Tilda 🙂 ) I’ve decided to make a Tilda-inspired creature with my new fabric.
The pieces are cut out and waiting in the wings.
They are at the back of a lengthy queue of crafty things on my ‘to do’ list – but I think they may well jump to the front 😉
Hope you all had a lovely weekend. I spent a couple of frustrating sessions struggling to get my chair arm sorted out (see this post here for an explanation of that statement!) In the end I decided to give it a rest and try again later.
That’s what my aim is for today. I shall take my time and think through the problem and I SHALL get it done!
Just look what arrived in the post on Saturday…
Tilda fabric 🙂
My lovely daughter has been on a trip to Norway and she sent us all pressies back. She knows me so well 🙂 . There were sweeties in the parcel too but they didn’t last long, we munched on them straight away.
But what to do with the lovely fabric?
Of course my first instinct is to make a Tilda creature with the Tilda fabric, but which one?
I’m also very tempted to have a go at designing my own Tilda inspired creature – what do you think? It was, after all, one of my New Year resolutions as can be seen clearly in black and white here.
But what creature could I have a go at making – any ideas?